Your cart is currently empty!
Abadia
Abadia
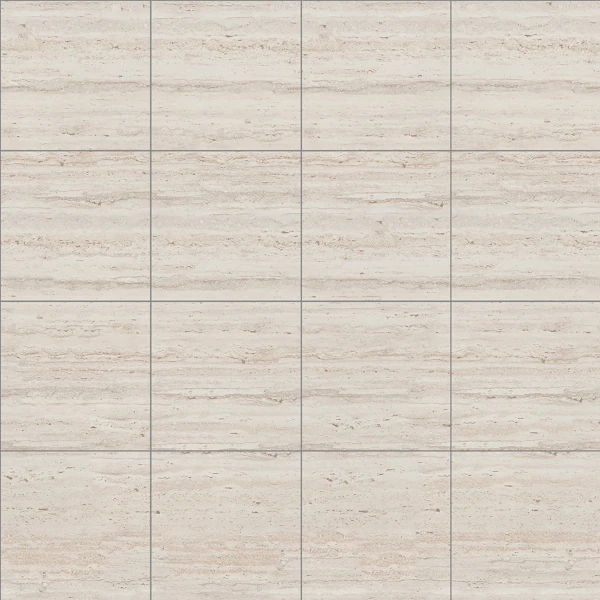
The Abadia Old World floor tile by Fired Earth Ceramics brings rustic charm and warmth to any room. This Spanish porcelain tile delivers a fired clay look, distinguishing itself with a rich brown color palette enhanced with subtle hints of red, orange and charcoal. With clean, straight edges and a matte finish, this versatile 20” floor tile will make any space feel more inviting.
$30.00
ABADIA OLD
The Abadia Old World floor tile by Fired Earth Ceramics brings rustic charm and warmth to any room. This Spanish porcelain tile delivers a fired clay look, distinguishing itself with a rich brown color palette enhanced with subtle hints of red, orange and charcoal. With clean, straight edges and a matte finish, this versatile 20” floor tile will make any space feel more inviting.
Spec Sparrow
-
How To Lay Floor Tiles
The installation step is where it all comes together, and you begin to see your beautiful design take shape. As in the rest of the process, it’s important to plan ahead to ensure the best possible results. We recommend reading through all of these steps first before you begin. We’ll cover mixing and laying thinset, laying tile and finishing touches like grouting, sealing and caulking.
Before you begin mixing and laying thinset, it’s important to know what open time and cure times are. Open time is the amount of time you have to work with your thinset before it hardens. This is also called bucket life. This is typically around 30–40 minutes and can vary by type of thinset, temperature, humidity, etc. To test if your thinset is still within its open time, do the finger test. If you stick your finger into the bucket of thinset and it comes out clean, it’s no longer tacky enough to stick to your tile or underlayment either. Once the thinset is past its open time, it needs to be thrown out, the bucket cleaned out and a new batch started. Cure time is the amount of time it takes for thinset to set up fully once it’s installed. Refer to manufacturer recommendations for cure times.
STEPS TO MIXING THINSET
- Start by adding your liquid to your bucket first. Refer to the manufacturer’s recommendations for the ratio of liquid to powder.
- Add powder in small batches to avoid clumps and bubbles of unmixed powder.
- Add enough powder to achieve the recommended consistency. We typically aim for a peanut butter consistency. A good tip is if you can scoop the thinset up with your trowel, turn it on its side and it stays a few seconds before falling into the bucket, it’s the correct consistency.
- Once you’ve reached the right consistency, let the thinset slake for 5–10 minutes (based on manufacturer’s recommendation). Slaking means letting the thinset sit in the bucket to allow the ingredients to activate and for crystals to form. This step is important to achieve good adhesion.
- Briefly remix thinset, and check for the correct consistency again.
- Start by mixing a small amount of thinset before you know how fast you will be working due to the open time (see below).
- NEVER rinse thinset down the drain when cleaning! This will set in and clog your pipes.
Once your thinset is ready, you can begin applying it to the substrate or underlayment with your notched trowel. For large-format tiles, you should also back butter the tile by applying thinset directly to the back of the tile. Your notched trowel will leave grooves on the substrate and/or tile. Make sure these are all running in the same direction to achieve a consistent mortar bed beneath the tile. Hold the trowel at approximately a 45° angle as you spread the thinset to achieve a thick enough layer.
It’s time to tile! When you set a tile into thinset, apply firm, even pressure. Wiggle the tile back and forth a bit to allow the ridges in the thinset to break down and fill in the valleys. This achieves a solid layer of thinset beneath the tile. After you do this with your first tile, lift it back up, and check to ensure there is 80–90% thinset coverage on the back of the tile. If there is not, recheck consistency of thinset, and make sure the correct size trowel is being used at the correct angle.
Don’t forget to use spacers in between tiles to get a consistent gap and grout lines throughout your installation. The spacers should be able to be removed after the thinset cures. Make sure to clean up any excess thinset on tiles and in between tiles as you go. It’s much easier to clean up when it’s wet. If you pause in your tiling, make sure to also wipe up any thinset on the floor that does not have tile on it. If it is left to dry, it can lead to an uneven surface. Make sure to clean all of your tools at the end of each day so that thinset and grout do not get caked on. Remember not to rinse or dump any thinset down the drain!
Prepare your space for grouting by cleaning off any excess thinset squeeze out and in grout joints. A utility knife works the best to clean out the grout joints. Make sure to swap out your water bucket regularly, work with clean water and use an almost dry sponge. Then, remove your spacers. If you have installed a man-made tile, such as glass, ceramic or porcelain, now is a good time to apply a grout release. This prevents the grout from sticking excessively to the surface of the tiles. If you are using natural stone or encaustic cement tiles, we recommend also applying a stone sealer before grouting. For particularly heavily textured stones, you can also use a grout release after this step.
Refer to any manufacturer’s recommendations for mixing your specific grout. This step may not be necessary since some grouts come premixed. Add liquid to the bucket first. Next, add powder in batches to avoid clumping. You can usually add more liquid but will tend to run out of powder first, so start mixing small batches first. Mix thoroughly to ensure all grout pigment is incorporated evenly to avoid streaking. Let grout mixture slake according to the manufacturer’s recommendation, and briefly remix before application. Keep open time and cure times in mind as you did for the thinset step.
Have a bucket of water and a sponge on hand to clean as you go. Begin applying your grout with a grout float. A grout float is a flat rubber or silicone tool with a flexible edge, similar to a spatula. Hold it at a 45° angle while also coming at your grout line diagonally. If you apply grout parallel to the joint, it will tend to pull grout out of the joint instead of pushing it in. Make sure to fill in the joint completely from top to bottom. We like to recommend alternating grouting and cleaning and switching back and forth every 10–30 minutes depending on the type of grout, temperature and other factors. That’s why it’s important to figure out the open time. Be careful not to use too much water when cleaning up as it can leach the pigment out of the grout and lighten the color. Minimize the amount of excess grout on the tile. It is easier to apply grout only to the joints of a large-format tile whereas a small mosaic will need to be almost fully covered to fill in all of the joints.
Once you are finished grouting, it is likely that a grout haze will form on the surface of the tiles. This is a very fine coating of grout and is normal. Let the grout set up for a few hours, and then use a recommended grout haze remover and a dry or almost dry sponge or rag. Come at the grout line at a diagonal to avoid removing grout from the joint. Next, you’ll want to strike your grout line. This means using a sponge that is almost dry to pull across the grout, smoothing it. Make sure to use light pressure on the corner of the sponge and with the tip of your finger. Make sure the sponge is almost entirely dry because water will smear the grout. Swap out your dirty water for clean water regularly, especially if you have a lot of grout haze. Follow the manufacturer’s recommended cure time.
-
How to safely transport tiles
It is a well-known fact that tiles are fragile goods and need special treatment during any type of transportation. That is why moving them is so stressful. Tiles can be damaged not only during shipping but also later while installing them, so it is wise to buy extra tiles just in case Here are a few tips on how to safely transport tiles: Terracotta should be shipped in the packaging provided by the producers. This is not only because of the fact that it is professionally secured. In addition, many producers put a special substance, which has a consistency similar to glue, on each tile to give them extra protection. This is easily removable after shipping. Tiles shouldn’t be carried by one person alone. They are simply too heavy. For example, popular Grès ceramic tiles can weigh over a dozen pounds (each!). The boot is the best place in a car for shipping tiles. Cargo should be secured so as not to move around, on a straight and stable surface. Shipping tiles on the back seat is quite risky. One disadvantage is that they can easily be damaged during the journey, but a bigger problem is that they could actually cause harm to us, e.g. during a traffic collision. Tiles placed in a boot should be protected from outside, especially if there is any empty space around them. In this case, the boot should be filled with cardboard, fabric or cushions. This ensures the tiles won’t move while you are driving. Tiles should be directly covered with a blanket for extra protection. The driver should be extremely careful and avoid sharp turns and sudden braking. Hiring a hauler for shipping tiles If you don’t want to move tiles by yourself, a hauler is definitely the best solution. Transport providers possess the right equipment and expertise to move delicate items such as tiles. Especially when it comes to international shipping, it is crucial to ensure that professionals deal with our load. Most haulers recommend shipping ceramics in pallets because it optimises loading and the whole transportation process. The priority is to find a reliable courier who will take care of the whole delivery. It’s a wise move to use Clicktrans.com, which gives access to verified and experienced companies specialised in transport jobs.
-
The Storage of tiles
Whether it’s a few extra left over after a project or you specifically ordered more that need to be stored for later use, sometimes you may have ceramic tile that needs storage. While you can store tile regardless of the elements, proper steps in storing the tile will ensure it remains intact over the years.
Climate
While climate can affect some materials, such as adhesives and paints, ceramic tile can store without regard to the weather or temperature. Heat and cold do not affect ceramic tile, nor is it subject to the freeze/thaw cycle like some materials, such as slate tile or tumbled marble. You can put it in your garage or a shed out back any time of the year.Moisture
Because ceramic tile is not porous it cannot soak up water, so it won’t freeze and therefore crack due to water expansion. In addition it is not subject to rot or mold because the material itself does not retain water. While it might ruin the cardboard containers it won’t affect the tile itself, so you can store tile without worrying about a little extra moisture.Proper Stacking
One of the most important parts of storing tile is knowing how to stack it. A couple of boxes on top of each other is not an issue, but if you need to store a large amount, the boxes need to be positioned in their factory position, with the tile stacked vertically on edge rather than flat. Stacking the tiles horizontally will result in pieces crushing and breaking under the weight, while vertically they can withstand plenty of pressure.
by
Tags: